 Broken links can negatively impact the user experience of your website and lead to visitors clicking away. To ensure a smooth browsing experience for your users and maintain the integrity of your website, it’s important to regularly find and fix broken links. In this article, we will explore different methods to identify and resolve broken links on your website.
Using a Broken Link Checker Plugin for WordPress
 If your website is built on WordPress, you can easily find and fix broken links by utilizing a broken link checker plugin. Here’s how you can do it:
- Access your WordPress dashboard and navigate to Plugins > Add New.
- Search for a reputable broken link checker plugin. One popular option is the “Broken Link Checker” plugin developed by WPMU DEV.
- Before installing a plugin, ensure that it meets certain criteria:
1 – The plugin should be frequently updated to ensure compatibility with the latest version of WordPress and to address any security concerns.
2 – It should be compatible with your specific version of WordPress. - Look for plugins that have a significant number of positive reviews and satisfied users. This indicates its reliability and effectiveness.
- Once you have chosen and installed the plugin, you can access it by going to Tools > Broken Links from your WordPress dashboard.
Give the plugin some time to scan and check the links on your website. This process may take a while, especially if your website has a large number of links.
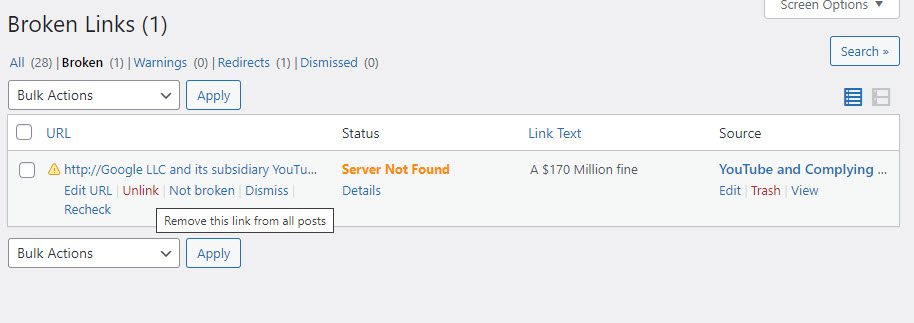
After the scan is complete, navigate to the “Broken” tab to view any broken links that were detected.
For each broken link, you have several options:
- Unlink the broken link from the page, which removes the hyperlink but keeps the anchor text intact.
- Edit the URL and replace it with the correct one.
- Dismiss the broken link, indicating that it should be ignored.
It’s worth noting that the plugin may flag YouTube video links as broken. In such cases, you can safely dismiss them as they are not actual broken links.
Fixing Redirects and Cleaning Up Broken Links
 Apart from identifying broken links, it’s essential to clean up any redirects and ensure they are pointing to the correct URLs.
Follow these steps to fix redirects and clean up broken links:
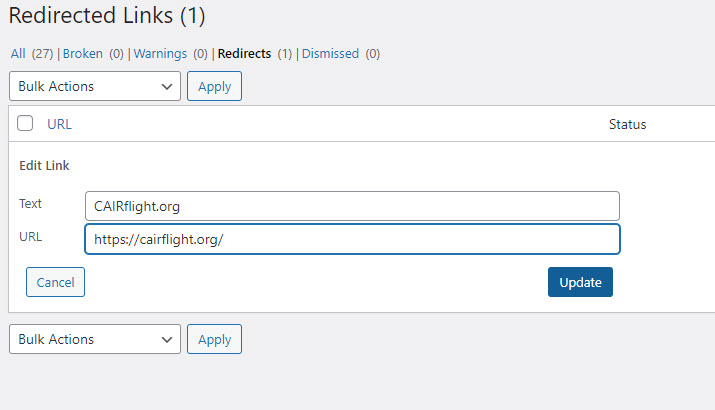
- Access the “Redirect” tab within the broken link checker plugin.
- Click on the redirect link, which will open the new URL in a separate tab.
- Copy the new URL and return to the broken links page.
- Edit the broken link and replace it with the correct URL.
Redirects often occur when you or another website changes the page name or when sites transition from HTTP to HTTPS. Although redirects are not technically considered broken links, it’s good practice to clean them up as well to maintain the overall health of your website.
Receive Email Notifications for Broken Links
To stay on top of broken links, you can configure the broken link checker plugin to send you email notifications whenever it detects any broken links. This allows you to address the issues promptly. Alternatively, if you prefer not to keep the plugin running continuously, you can uninstall and reinstall it periodically to check for broken links. It’s recommended to perform these checks monthly or at least quarterly to ensure your website remains in good technical shape.
Finding broken links on sites that DO NOT use WordPress
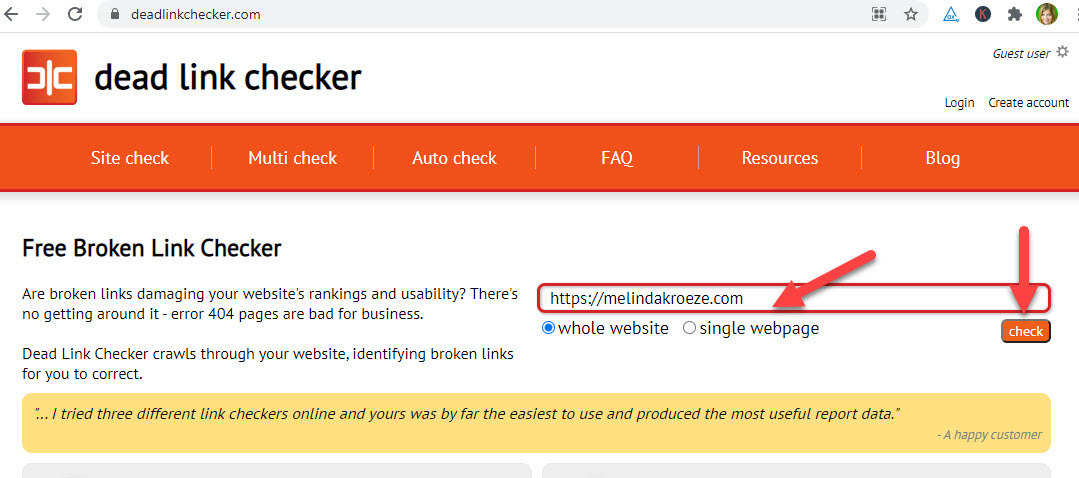
 If your website is not built on WordPress, you can still identify broken links by using online tools designed for this purpose. One such tool is www.deadlinkchecker.com.
Follow these steps to find broken links on non-WordPress websites:
- Visit www.deadlinkchecker.com or a similar service.
- Enter your website’s URL and click the “check” button.
- Depending on the size of your site, the checking process may take some time. Use this opportunity to take a break or grab a cup of coffee.
- Once the check is complete, the tool will generate a report listing all the 404 errors (broken links) it found.
While using external tools may not be as convenient as using a WordPress plugin, they still provide an effective means to locate broken links on your website.
Preventing Future Broken Links
After finding and fixing broken links on your website, it’s essential to take preventive measures to avoid their occurrence in the future. While you can’t control broken links on external websites, you can certainly prevent 404 errors on your own site.
When changing the page slug (the URL address of a page) for a published page, set up a redirect from the old page name to the new one. This ensures that visitors who click on the old link are seamlessly redirected to the correct page.

Redirection plugins, such as “Redirection” by John Godley for WordPress, can help you manage redirects efficiently.
- Install a redirection plugin from Plugins > Add New in your WordPress dashboard.
- Activate the plugin and complete the setup process.
- Access the redirection page from Tools > Redirection in your WordPress dashboard.
- Add new redirects by specifying the old and new page URLs and clicking “Add Redirect.”
Redirects should be considered a temporary fix, as search engines usually update the links fairly quickly. If you notice that old links are still receiving clicks even after adding redirects, you should investigate their source. The broken link checker will identify redirects in the “redirects” tab, allowing you to fix the link with the correct URL.
What does a redirect do?
- It tells search engine crawlers “Hey this page has a new address” so they can update the link if it was indexed
- Visitors that click the old link are seamlessly redirected to the correct page
Remember that while search engines don’t penalize websites for 404 errors, it’s crucial to minimize them to provide a positive user experience. By regularly finding and fixing broken links, you can enhance your website’s functionality, improve user satisfaction, and maintain a healthy online presence.
